[Code for this article is available on GitHub here.]

One of the new features in NHibernate 3 is the addition of a fluent API for configuring NHibernate through code. Fluent NHibernate has provided a fluent configuration API for awhile, but now we have an option built into NHibernate itself. (Personally I prefer the new Loquacious API to Fluent NHibernate’s configuration API as I find Loquacious more discoverable. Given that Fluent NHibernate is built on top of NHibernate, you can always use Loquacious with Fluent NHibernate too. N.B. I still really like Fluent NHibernate’s ClassMap<T>, automapping capabilities, and PersistenceSpecification<T>. So don’t take my preference regarding fluent configuration as a denouncement of Fluent NHibernate.)

The fluent configuration API built into NHibernate is called Loquacious configuration and exists as a set of extensions methods on NHibernate.Cfg.Configuration. You can access these extension methods by importing in the NHibernate.Cfg.Loquacious namespace.

var cfg = new Configuration();
cfg.Proxy(p => p.ProxyFactoryFactory<ProxyFactoryFactory>())
   .DataBaseIntegration(db => {
                            db.ConnectionStringName = "scratch";
                            db.Dialect<MsSql2008Dialect>();
                            db.BatchSize = 500;
                        })
   .AddAssembly(typeof(Blog).Assembly)
   .SessionFactory().GenerateStatistics();

On the second line, we configure the ProxyFactoryFactory, which is responsible for generating the proxies needed for lazy loading. The ProxyFactoryFactory type parameter (stuff between the <>) is in the NHibernate.ByteCode.Castle namespace. (I have a reference to the NHibernate.ByteCode.Castle assembly too.) So we’re using Castle to generate our proxies. We could also use LinFu or Spring.

Setting db.ConnectionStringName causes NHibernate to read the connection string from the <connectionStrings/> config section of the [App|Web].config. This keeps your connection strings in an easily managed location without being baked into your code. You can perform the same trick in XML-based configuration by using the connection.connection_string_name property instead of the more commonly used connection.connection_string.

Configuring BatchSize turns on update batching in databases, which support it. (Support is limited to SqlClient and OracleDataClient currently and relies on features of these drivers.) Updating batching allows NHibernate to group together multiple, related INSERT, UPDATE, or DELETE statements in a single round-trip to the database. This setting isn’t strictly necessary, but can give you a nice performance boost with DML statements. The value of 500 represents the maximum number of DML statements in one batch. The choice of 500 is arbitrary and should be tuned for your application.

The assembly that we are adding is the one that contains our hbm.xml files as embedded resources. This allows NHibernate to find and parse our mapping metadata. If you have your metadata located in multiple files, you can call cfg.AddAssembly() multiple times.

The last call, cfg.SessionFactory().GenerateStatistics(), causes NHibernate to output additional information about entities, collections, connections, transactions, sessions, second-level cache, and more. Although not required, it does provide additional useful information about NHibernate’s performance.

Notice that there is no need to call cfg.Configure(). cfg.Configure() is used to read in configuration values from [App|Web].config (from the hibernate-configuration config section) or from hibernate.cfg.xml. If we’ve not using XML configuration, cfg.Configure() is not required.

Loquacious and XML-based configuration are not mutually exclusive. We can combine the two techniques to allow overrides or provide default values – it all comes down to the order of the Loquacious configuration code and the call to cfg.Configure().

var cfg = new Configuration();
cfg.Configure();
cfg.Proxy(p => p.ProxyFactoryFactory<ProxyFactoryFactory>())
   .SessionFactory().GenerateStatistics();

Note the cfg.Configure() on the second line. We read in the standard XML-based configuration and then force the use of a particular ProxyFactoryFactory and generation of statistics via Loquacious configuration.

If instead we make the call to cfg.Configure() after the Loquacious configuration, the Loquacious configuration provides default values, but we can override any and all values using XML-based configuration.

var cfg = new Configuration();
cfg.Proxy(p => p.ProxyFactoryFactory<ProxyFactoryFactory>())
   .DataBaseIntegration(db => {
                            db.ConnectionStringName = "scratch";
                            db.Dialect<MsSql2008Dialect>();
                            db.BatchSize = 500;
                        })
   .AddAssembly(typeof(Blog).Assembly)
   .SessionFactory().GenerateStatistics();
cfg.Configure();

You can always mix and match the techniques by doing some Loquacious configuration before and som after the call to cfg.Configure().

WARNING: If you call cfg.Configure(), you need to have <hibernate-configuration/> in your [App|Web].config or a hibernate.cfg.xml file. If you don’t, you’ll throw a HibernateConfigException. They can contain an empty root element, but it needs to be there. Another option would be to check whether File.Exists(‘hibernate.cfg.xml’) before calling cfg.Configure().

So there you have it. The new Loquacious configuration API in NHibernate 3. This introduction was not meant as a definitive reference, but as a jumping off point. I would recommend that you explore other extension methods in the NHibernate.Cfg.Loquacious namespace as they provide the means to configure the 2nd-leve cache, current session context, custom LINQ functions, and more. Anything you can do in XML-based configuration can now be accomplished with Loquacious or the existing methods on NHibernate.Cfg.Configuration. So get out there and start coding – XML is now optional…

Darth VaderThanks to everyone who came out to my session on Convention-over-Configuration on the Web at TechDays Calgary 2010. I enjoyed sharing my ideas about convention-over-configuration and how it can simplify software development. You expend some serious brain power over figuring out how to enable your application-specific conventions, but everything after that flows easily and without repetition. You end up doing more with less code. During the talk, I demonstrated how frameworks like Fluent NHibernate, AutoMapper, Castle Windsor, ASP.NET MVC, and jQuery support this style of development. (Links below.) I only scratched the surface though. With a bit of creative thinking, you can use these techniques in your own code to reduce duplication and increase flexibility.

You can grab a zip of the source code directly from here or view the source tree on GitHub here.

In Improving Your Audio: Hardware Edition, I focused on the importance of good audio hardware. No amount of post-processing is going to turn poor raw audio into a listenable podcast/webcast/screencast. It would be like trying to print a high resolution image from a grainy scan. Sure you can interpolate pixels to clean up the graininess, but you’re not going to make detail magically appear that wasn’t in the original scan. The same is true with audio. You can clean up bad audio by removing pops and hisses, but you’re not going to make good sound magically appear from poor quality raw audio.

Pop FilterOne inexpensive piece of equipment that will save you a lot of retakes and clean-up is the pop filter. A pop filter is a thin screen of fabric that sits between you and your microphone and will set you back about $20. The pop filter is the black circle on the gooseneck in the image on right. (Image used with permission under Creative Common Attribution 2.0.) A pop filter prevents “p” and “t” sounds from making “popping” sounds in your audio. Without a pop filter, you end up with audio like this:

[audio:wp-content/uploads/NoPopFilter.ogg|wp-content/uploads/NoPopFilter.mp3]

I’ve recorded the same phrase at the same distance from the microphone, but now with a pop filter between me and the mic:

[audio:wp-content/uploads/PopFilter.ogg|wp-content/uploads/PopFilter.mp3]

The popping is caused by the rapid burst of air overloading the input capacity of the microphone, which results in clipping. You can see it if we look at the waveform of the raw audio.

Audio Clipping Due to Popping

Notice how the audio in the top recording is clipped where the microphone is overloaded. (+/- 1.0 is 100% input in Audacity.)

Most headset microphones like the LifeChat LX-3000 have a wind shield, which performs the same function as a pop filter. A wind shield is a fancy term for that piece of foam on the actual microphone. The main disadvantage of a wind shield over a pop filter is that wind shields “colour” the audio more. A good pop filter is acoustically neutral, which means that your audio sounds the same with and without the pop filter – it only eliminates the popping from “p” and “t” sounds. Also remember to attach your pop filter to your mic stand or boom and not directly to the microphone otherwise the microphone will pick up vibrations from the pop filter.

The moral of the story… If you’re going to spend money on good audio gear, don’t forget to buy a pop filter. The $20 it costs you will more than pay for itself in better audio quality and time saved in fewer edits and retakes.

Until next time, happy ‘casting!

Over the years, I’ve done a lot of audio work between podcasts, screencasts, and webcasts. So I know a thing or two about computer audio. I don’t claim to be an expert like my friends Carl Franklin or Richard Campbell, but I’ve done enough to be able to offer some helpful tips. We’re going to start with the hardware.

The quality of your computer audio can only be as good as the raw captured product. Use a bad microphone and no amount of software cleanup is going to magically produce good audio. You might be wondering how much difference the hardware can make? I’ve recorded the same audio track using four (4) different microphones on the same computer. (I didn’t record them simultaneously as multi-track recording is notoriously difficult, but I did say the same phrase into each microphone on after the other.) Let’s start with the LifeChat ZX-6000.

LifeChat ZX-6000 [audio:wp-content/uploads/LifeChatZX-6000.ogg|wp-content/uploads/LifeChatZX-6000.mp3]

My voice sounds like I’m on a telephone. The sound is hollow and lacks depth. If we plot a frequency analysis using Audacity, we can easily see the problems.

LifeChat ZX-6000 Frequency Spectrum

OK, maybe not easily if you’re not familiar with audio. Let me explain some basic ideas and then you should be able to see the problems.

Normal human hearing discerns frequencies between 20 Hz and 20 kHz. The standard tuning note for musicians is the 440 Hz, which is an A above middle C on the piano. The lowest note on the piano (A0) is 27.5 Hz and the highest note (C8) is 4186 Hz. (I’m using the example of a piano since many people, even non-musicians, have at least played with a piano at one time or another.) Lower frequencies correspond to lower notes and higher frequencies to higher notes. The frequencies mentioned are the fundamental frequencies. When you play an A4 on the piano (or any other instrument including the human voice), the major frequency is 440 Hz, but there are many harmonics or overtones that occur. These harmonics give a colour and depth to the sound. This is one of the reasons why different instruments sound vastly different when playing the same note – the harmonics produced by each instrument are quite different. This is how we perceive different ranges of audio frequencies. (Taken from Wikipedia Audio Frequency.)

Frequency (Hz) Octave Description
16 to 32 1st The human threshold of feeling, and the lowest pedal notes of a pipe organ.
32 to 512 2nd to 5th Rhythm frequencies, where the lower and upper bass notes lie.
512 to 2048 6th to 7th Defines human speech intelligibility, gives a horn-like or tinny quality to sound.
2048 to 8192 8th to 9th Gives presence to speech, where labial and fricative sounds lie.
8192 to 16384 10th Brilliance, the sounds of bells and the ringing of cymbals. In speech, the sound of the letter "S" (8000-11000 Hz)

Note how 2048 to 8192 Hz gives a presence to speech, whereas 8192 to 16384 give a brilliance. Without these frequencies present, speech will sound hollow.

With this in mind, let’s take another look at the frequency spectrum from the LifeChat ZX-6000. We see virtually no frequencies above 4000 Hz, which is making my voice sound hollow. Old analog telephones transmitted 200 Hz to 3000 Hz, which is why it sounds like I’m talking on an old phone. You’ll also note that the lower frequencies (below 400 Hz) are attenuated (e.g. not as pronounced), which is why the sound is lacking some of the bass timbre of my voice.

Let’s try a different microphone and see how it performs… Next up the LifeChat LX-3000.

LifeChat LX-3000 [audio:wp-content/uploads/LifeChatLX-3000.ogg|wp-content/uploads/LifeChatLX-3000.mp3]

The audio quality is vastly improved. Let’s take a look at the frequency spectrum.

LifeChat LX-3000 Frequency Spectrum

You can visibly see the difference. We have frequency response all the way up to 20 kHz with the majority of the response in the lower frequencies, which is expected due to the timbre of my voice. The lower frequencies are also not as attenuated. The quality of the sound is much warmer and vibrant with the LX-3000 than the ZX-6000.

As our last point of comparison, let’s listen to a semi-pro microphone – the one I use for my recording work – the audio-technica AT2020.

audio-technica AT2020 [audio:wp-content/uploads/AudioTechnica.ogg|wp-content/uploads/AudioTechnica.mp3]

The differences are subtler this time, but still noticeable. The audio has more depth and presence than with the LX-3000. Let’s take a look at the frequency spectrum.

audio-technica AT2020 Frequency Spectrum

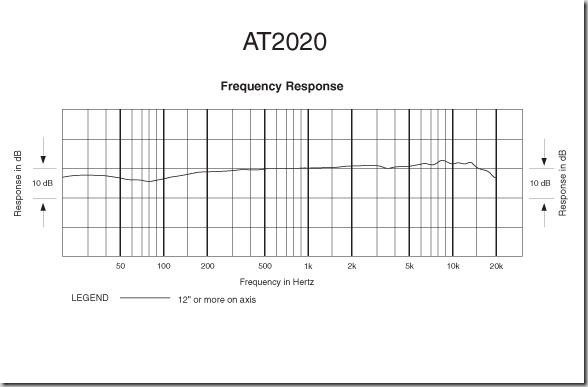
Notice the better bass response below 400 Hz giving a truer rendering of my low voice. We also have better harmonics in the 10 to 20 kHz range, providing a more life-like sound. We can also take a look at the frequency response of the microphone, which can be found on the manufacturer’s website here.

audio-technica AT2020 Frequency Response

Note the flat response curve across the entire range of frequencies. This means that the microphone records all frequencies with equal efficiency, which results in little distortion of the raw sound. For comparison, I would expect the response curve for the ZX-6000 to drop to virtually zero above 4 kHz and show attenuation below 400 Hz. You want a flat response curve for your microphone as it will not colour or distort the recorded audio.

I should note that both the LifeChat LX-3000 and ZX-6000 have hardware noise cancellation. (Noise cancellation will remove an annoying background hum originating from fans, pumps, and other sources of low background noise. It can’t do anything to clean up dogs barking, children screaming, or other sudden noises that disrupt your recording sessions.) Applying software noise cancellation on either of these microphones has little additional benefit. The audio-technica AT2020 does not have hardware noise cancellation and benefits from applying software noise cancellation. Assuming you are working in a quiet environment the audio quality of the AT2020 without noise cancellation is still better than the LX-3000 and far superior with noise cancellation. Software noise cancellation usually involves little more than selecting a checkbox in programs like TechSmith Camtasia Studio or similar recording packages. You can perform noise removal using Audacity too, though it’s a bit more work as you have to manually select a quiet region with just the background noise that you want to subtract.

The LX-3000 is a great microphone for conference calls and gaming. It is a good, though not great, microphone for recording podcasts/screencasts/webcasts. It is inexpensive ($30 to $50), easy to use, and can be bought at most computer stores. If you’re just getting started, this is a good microphone to buy.

If you’re looking to take your audio to the next level, the audio-technica AT2020 is a great semi-pro microphone that you can pick up at reasonable cost. You’ll have to go to an audio specialty store as you won’t find these in your regular computer stores. I purchased mine at Long & McQuade, which is a chain of well-respected Canadian musical instrument stores. Now what is a reasonable cost? You’ll need more than just a microphone. You’ll also need a pre-amp to power the microphone as semi-pro and pro microphones don’t have high enough output to jack directly into your computer microphone port. You’ll need a pop filter (which prevents “p” and “t” sounds from making “popping” sounds in your audio), a mic stand, an XLR cable for mic to preamp, and a 1/4” to 1/4” male cable for preamp to computer (or 1/4” to 1/8” male if you are using a normal mic-in on your computer).

Component Price*
audio-technica AT2020 $120
ART TubeMP Tube Mic Preamp $49
Pop Filter $20
Mic Stand $20
2 Cables (XLR & 1/4”-1/4”) $20
Total $229

* Prices are in Canadian dollars.

You can get the same microphone (AT2020) with a USB option, but at a higher cost of $170, which is basically the cost of the preamp and cables. The TubeMP preamp has an actual vacuum tube that gives a warmth to the sound that is hard to achieve otherwise. Given the similar costs, I would personally err on the side of using a tube preamp over USB.

You might want to invest in a decent sound card, such as a Creative Labs X-Fi Platinum or similar card, which has better audio recording qualities than the audio-in that comes on your motherboard. It’s hard to find the X-Fi cards anymore. So you’ll have to look around to find a good quality audio card, but expect to spend $100 to $200 on the audio card alone. Remember your audio is going to be no better than the weakest link in the chain.

Is $229 of the audio-technica AT2020 worth the improved audio over the $30 to $50 LifeChat LX-3000? That’s up to you to decide.

Prairie Developer Conference

Prairie Dev Con was a blast. Great job by D’Arcy on organizing the conference. Thank you to everyone who attended my sessions and especially those who asked questions. I also enjoyed catching up with many of my friends who showed up, even if I was only able to speak to some of the briefly. (It was a busy two days.)

For those of you looking for session slides and code, you can find it here:

jQuery Dojo

NHibernate Dojo

Advanced NHibernate

BTW – I applaud D’Arcy’s bravery in going to a Saskatchewan Roughriders autograph signing in an Alouette jersey and asking them to sign his calculator. Classic! For those of you unfamiliar with the story, the Alouettes beat the Roughriders in the Grey Cup (Canadian football equivalent of the SuperBowl) this year due to a “too many men on the field” penalty in the closing seconds of the game. Fortunately the Roughriders were good sports about the prank. Check out D’Arcy’s blog post for full details and video footage of the stunt.

psake It is with great pleasure that I announce psake v4.00, which you can download here. The project has grown up a great deal in the last few months. More projects are using psake for orchestrating their builds and we have more developers submitting patches. I’m really pleased with how psake is growing up. GitHub has become our coordination point for the project, which you can find here, and we will be retiring the Google Code site. Jorge has started work on a FAQ, which will make it easier for developers to get started with psake. Look for it on the GitHub wiki in the next few weeks.

What’s new in psake v4.00?

  • Exec helper function
  • .NET 4.0 support
  • 64-bit support
  • psake.ps1 helper script
  • Support for parameters & properties
  • Support for nested builds
  • Tab expansion
  • Invoke default script
  • Various minor bug fixes

Exec Helper Function

The exec helper function was included in the psake v2.02 patch, but it bears mentioning again. If you are executing a command line program (such as msbuild.exe, aspnet_compiler.exe, pskill.exe, …) rather than a PowerShell function, it will not throw an execption on failure, but return a non-zero error code. We added the exec helper function, which takes care of checking the error code and throwing an exception for command line executables.

task Compile -depends Clean {
  exec { msbuild Foo.sln }
}

You can find out more details here.

.NET 4.0 Support

psake still defaults to .NET Framework 3.5, but you can specify another framework to use from the command line:

invoke-psake examples\default.ps1 -framework 4.0

Or from within your script:

$framework = '4.0'

task default -depends MsBuild

task MsBuild {
  exec { msbuild /version }
}

64-bit Support

You can now specify whether you want to use 32-bit (x86) or 64-bit (x64) tools when building your projects.

invoke-psake examples\default.ps1 -framework 3.5x86
invoke-psake examples\default.ps1 -framework 3.5x64

If you don’t specify x86 or x64 after the framework version, psake selects the framework bitness based on whether you’re running from a 32-bit or 64-bit PowerShell prompt. (On 64-bit Windows, the default PowerShell prompt is 64-bit. If you want a 32-bit prompt, launch “Windows PowerShell (x86)”. Valid values for the framework are ‘1.0’, ‘1.1’, ‘2.0’, ‘2.0×86’, ‘2.0×64’, ‘3.0’, ‘3.0×86’, ‘3.0×64’, ‘3.5’, ‘3.5×86’, ‘3.5×64’, ‘4.0’, ‘4.0×86’, and ‘4.0×64’.

psake.ps1 Helper Script

Because psake is a PowerShell module, you have to import the module before using it.

import-module .\psake.psm1
invoke-psake examples\default.ps1
# do some work
invoke-psake examples\default.ps1
# do some more work
remove-module psake # when done, remove psake or close your PS prompt

If you want to use the psake.psm1 stored in a particular project’s repository, you have to remember to import the correct version of psake from that project. You also need to create a ps1, bat, or cmd file for your continuous integration server so that the correct version of psake is registered to orchestrate the build. We have standardized this using a psake.ps1 helper script:

# psake.ps1
# Helper script for those who want to run
# psake without importing the module.
import-module .\psake.psm1
invoke-psake @args
remove-module psake

With this script, you can now execute psake without first importing the module.

.\psake examples\default.ps1 test

You can read about the splatting operator (@) here if you’re wondering what invoke-psake @args does.

Support for Parameters and Properties

Invoke-psake has two new options, –parameters and –properties. Parameters is a hashtable passed into the current build script. These parameters are processed before any ‘Properties’ functions in your build scripts, which means you can use them from within your Properties.

invoke-psake Deploy.ps1 -parameters @{server=’Server01’}

# Deploy.ps1
properties {
  $serverToDeployTo = $server
}

task default -depends All

# additional tasks

Parameters are great when you have required information. Properties on the other hand are used to override default values.

invoke-psake Build.ps1 -properties @{config='Release'}

# Build.ps1
properties {
  $config = 'Debug'
}

task default -depends All

# additional tasks

Support for Nested Builds

You can now invoke build scripts from within other build scripts. This allows you to break large, complex scripts into smaller, more manageable ones.

task default -depends RunNested1, RunNested2

task RunNested1 {
  Invoke-psake .\nested\nested1.ps1
}

task RunNested2 {
  Invoke-psake .\nested\nested2.ps1
}

Tab Expansion

Dusty Candland implemented PowerShell tab expansion for psake. You can find instructions on setting up tab expansion in ./tabexpansion/Readme.PsakeTab.txt in the download. Once configured, you can:

tab completion for file name: psake d<tab> -> psake .\default.ps1
tab completion for parameters: psake -t<tab> -> psake -task
tab completion for tasks: psake -task c<tab> -> psake -task Clean

You can find more details on Dusty’s blog here. Excellent addition! Thanks, Dusty.

Invoke Default Script

Jason Jarrett provided this welcome fix, which allows you to execute tasks without specifying the default build file name (default.ps1).

invoke-psake Compile # Executes the Compile task in default.ps1

Previously you had to specify invoke-psake default.ps1 Compile. You could only omit default.ps1 if you were running the default task.

Big Thanks!

Thanks to everyone who contributed to this release, especially Jorge Matos who contributed many of the new features noted above. If you have any questions, please join the psake-users Google Group. If you’re interested in contributing to the ongoing development, we also have a psake-dev Google Group. Happy scripting, everyone!

P.S. Wondering what happened to psake v3.00? It’s chilling with its friends EF v2 and EF v3…

BatmanNo, this post is not a tribute to the fabulously kitschy Batman TV series (1966-1968) starring Adam West and Burt Ward. Or a tribute to the onomatopoeic sounds for which it and the Batman comics were famous. This show did however come to mind when I was trying to solve a PowerShell problem and ran across the wonderfully-named splatting (@) operator introduced in PowerShell v2. Before we get to the splatting operator, let’s look at the problem that it was designed to solve.
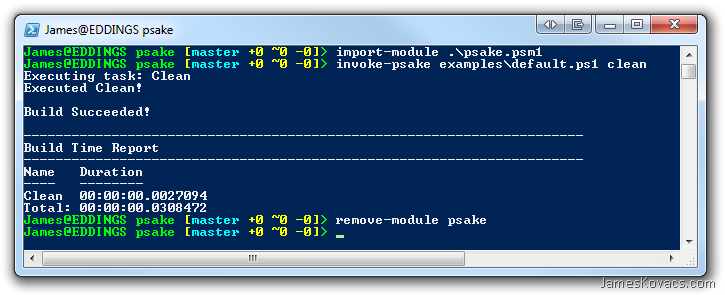
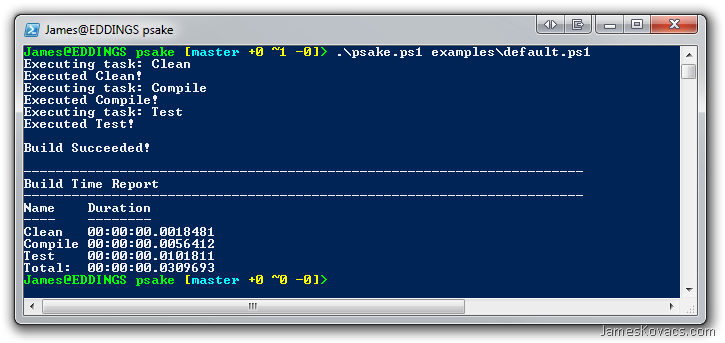
With psake v2 came the change from a PowerShell script to a PowerShell module. Modules provide a lot of advantages over a simple script. For psake the compelling advantages were better control over scoping and better integration with PowerShell’s help system. One disadvantage was that you now had to first import the module before you could use psake.

image

ASIDE: If you’re wondering about the “James@EDDINGS psake [master +0 ~1 -0]>” stuff, I’ve installed Mark Embling’s awesome PowerShell Git Prompt, which is simply a custom PowerShell prompt. It tells me that my user is James, I’m logged into my main dev machine (EDDINGS), I’m in the psake directory (c:\dev\oss\psake) – though I only display the last part of the path for brevity, I’m on the “master” branch, I have no pending additions (+0), no pending changes (~0), and no pending deletions (-0). (I need to see if I can hack in how many commits forward or back I am from a tracked remote.) Everything in brackets is omitted if it isn’t a Git directory. Another good set of Git/PowerShell scripts is Jeremy Skinner’s PowerShell Git Tab Expansion for completing common command names, branch names, and remote names. If you are using Git and PowerShell, I would highly recommend both Mark’s and Jeremy’s scripts. If you don’t want to copy/paste them together, you can grab them from my random collection of PowerShell scripts here.

Note how we had to first call “import-module” before we could use psake. For some people, they install the latest version of psake in some well-known location, import the module, and then run it from there until the next update comes out. For others (e.g. me), we like to version psake along with our source code and other dependencies. Importing a project-specific copy of psake becomes a headache very quickly. So I wrote a little shim script to register psake, run it, and then unregister it.

# Helper script for those who want to run
# psake without importing the module.
import-module .\psake.psm1
invoke-psake $args
remove-module psake

Seems reasonable enough. We simply pass along the script arguments ($args) to the invoke-psake command and everything should be fine.

image

OK. What happened? PowerShell did what we told it to. It called the function, invoke-psake, with an array as its first parameter rather than using the array as the list of parameters as we intended. Let’s fix that.

# Helper script for those who want to run
# psake without importing the module.
import-module .\psake.psm1
invoke-psake $args[0] $args[1]
remove-module psake

One little problem.

image

Note that we left out the task (“clean” previously) so that psake would use the default. Rather than using the default, invoke-psake has been passed a null argument for the task. We could fix this by detecting null arguments in invoke-psake and explicitly specifying the defaults. It’s ugly because we couldn’t use PowerShell’s syntax for specifying defaults, but it would work. Another problem is that we would need to add as many $args[N] as we expected to receive arguments. A messy solution all around.

Fortunately PowerShell v2 has an elegant solution to this problem called the splatting operator, denoted by @. The splatting operator binds an array to the argument list of a function.

# Helper script for those who want to run
# psake without importing the module.
import-module .\psake.psm1
invoke-psake @args
remove-module psake

Note the subtle change. Rather than using $args we use @args.

image

Success! And it’s not just for passing arguments from one script to another. You can create arr

 image

Note the call to “Add $addends” where PowerShell called the Add function once for every item in the array. Not what we intended. “Add @addends” using the splatting operator gave us the expected result. You can even use a hashtable to splat named parameters.

image

Note that the answer was 1 (e.g. 11 % 10) and not 10 (e.g. 10 % 11). The splatting operator properly bound the value 11 to the x parameter and 10 to the y parameter, just as it was in the hashtable.

The splatting operator provides us with a tremendous amount of flexibility in manipulating function and script arguments. It’s a useful tool to add to your PowerShell arsenal. Go forth and SPLAT!

DevTeach.com Another year, another DevTeach. A big thank you to everyone involved. To the organizers, Jean-Rene Roy and Maryse Dubois, thank you for continuing to support and encourage the Canadian developer community. To my fellow Tech Chairs, for helping select an awesome array of both local and international talent to present. To my fellow speakers, for giving some fantastic talks. To all the attendees, for their eager participation, helpful comments, and continued encouragement. To old friends and new whom I spent catching up with in the unofficial speakers lounge, at dinner, and around drinks. There is always something new and fun at DevTeach and this year was no exception. Here are the slides decks and code for those interested:

Convention-over-Configuration in a Web World (pptx | code)

Convention-over-Configuration in an Agile World (pptx | code)

Agile Development with IoC and ORM (pptx | code)

If anyone has any questions, comments, or issues with the slidedecks or code, don’t hestitate to leave me a comment.

Prairie Developer ConferenceA few months ago, my friend, D’Arcy Lussier, and I had the following conversation:

D’Arcy:

Want to speak at a developer conference?

Me:

Sure. Sounds awesome!

D’Arcy:

It’ll be in Regina, Saskatchewan.

Me:

Sweet!

D’Arcy:

It’ll be in June.

Me:

Where do I sign up!?!

All joking aside, D’Arcy is putting together what looks to be a great regional conference. I think D’Arcy’s explanation of how this conference came to be describes it best:

“Having lived my life between Manitoba and Saskatchewan, I saw an opportunity to create an event to bring high calibre presenters and sessions to the talented technology professionals of the Canadian prairies, and thus the Prairie Developer Conference was born!”
— D’Arcy Lussier, Prairie Developer Conference Chair

The conference will take place June 2 & 3, 2010 in Regina, Saskatchewan. I’ll be giving two dojos, one on jQuery and the other on NHibernate. If you’ve been wanting to learn these technologies, I’ll be walking you through them – dojo-style – so you can follow along with your own laptops.

NHibernateNHibernate Dojo

I’ll be covering NHibernate fundamentals, mapping with Fluent NHibernate, and querying with LINQ to NHibernate. This session is intended to be very interactive with attendees working examples on their own laptops and asking questions.

jQueryjQuery Dojo

I should have called this session: Dr. Weblove or How I Learned to Stop Worrying and Love JavaScript. In this dojo, I’ll take you on a tour of jQuery and show you that JavaScript is anything but a toy language. JavaScript is a powerful functional language and jQuery allows you to harness that power with truly amazing results. Come learn about selectors, effects, DOM manipulation, CSS, AJAX, eventing, and much more.

imageIn addition to my two dojos and sessions by many other speakers, my friend, Donald “IglooCoder” Belcham will be giving a post-con on “Making the Most of Brownfield Application Development”. If you’ve got a legacy codebase that needs taming – and who doesn’t? – this is a great post-con to check out.
Registration is now open at a price that won’t break your (or your employer’s) bank. Come check it out.

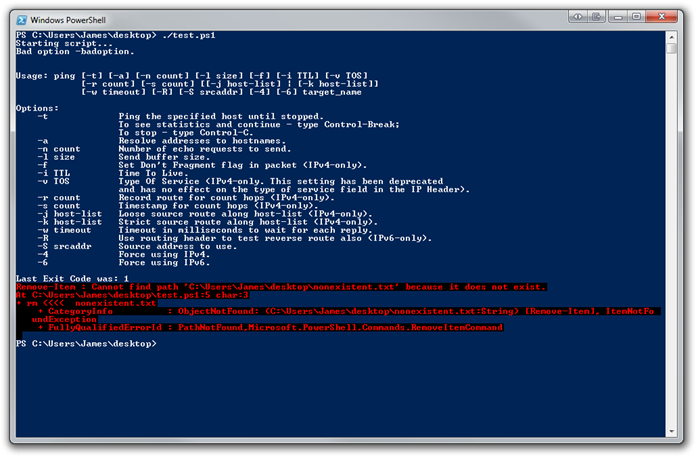
I must admit that I don’t much care for PowerShell’s default behaviour with respect to errors, which is to continue on error. It feels very VB6 “On Error Resume Next”-ish. Given that it is a shell scripting language, I can understand why the PowerShell team chose this as a default. Fortunately you can change the default by setting $ErrorActionPreference = ‘Stop’, which terminates execution by throwing an exception. (The default value is Continue, which means the script prints the error and continues executing.) Unfortunately this only works for PowerShell commands and not external executables that return non-zero error codes. (In the shell world, a return code of zero (0) indicates success and anything else indicates failure.)

Take the following simple script:

'Starting script...'
$ErrorActionPreference = 'Stop'
ping -badoption
"Last Exit Code was: $LastExitCode"
rm nonexistent.txt
'Finished script'

image

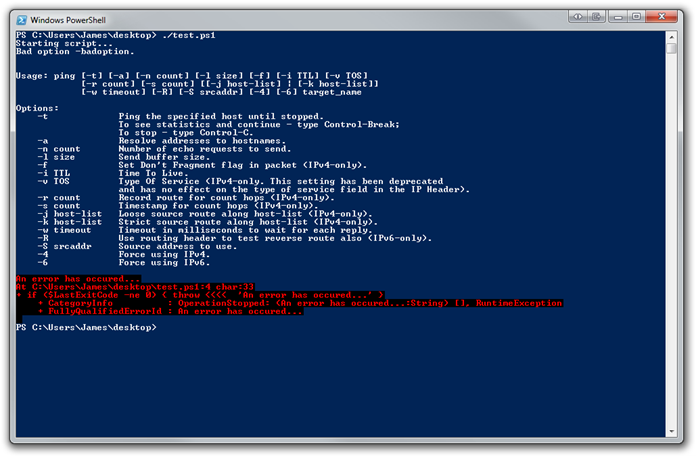
Notice how execution continued after the ping command failed with an exit code of one (1) even though we have $ErrorActionPreference set to ‘Stop’. Also notice that the rm command, which is an alias for the PowerShell command, Remove-Item, did cause execution to abort as expected and ‘Finished script’ was never printed to the console. The discrepancy in error handling between PowerShell commands and executables is annoying and forces us to constantly think about what we’re calling – a PowerShell command or an executable. The obvious solution is:

'Starting script...'
$ErrorActionPreference = 'Stop'
ping -badoption
if ($LastExitCode -ne 0) { throw 'An error has occurred...' }
rm nonexistent.txt
'Finished script'

image

The error handling code adds a lot of noise, IMHO, and feels like a throwback to COM and HRESULTs. Can we do better? Jorge Matos, one of the psake contributors came up with this elegant helper function:

function Exec([scriptblock]$cmd, [string]$errorMessage = "Error executing command: " + $cmd) { 
  & $cmd 
  if ($LastExitCode -ne 0) {
    throw $errorMessage 
  } 
}

Note the “& $cmd” syntax. $cmd is a scriptblock and & is used to execute the scriptblock. We can now re-write our original script as follows. (N.B. Exec function is elided for brevity.)

'Starting script...'
$ErrorActionPreference = 'Stop'
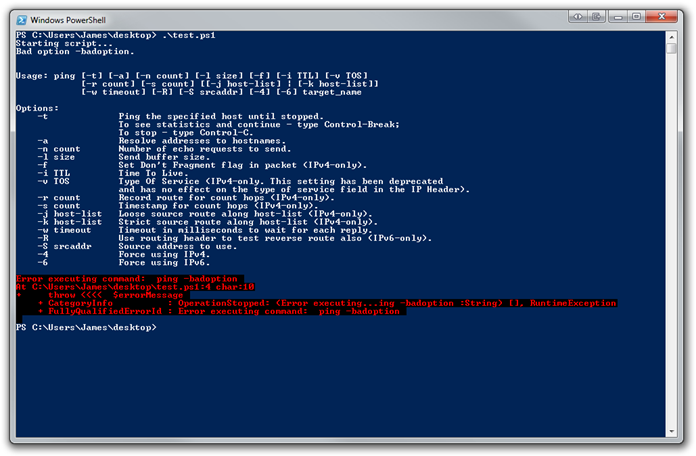
exec { ping -badoption }
rm nonexistent.txt
'Finished script'

image

The script now terminates when the bad ping command is executed. We do have to remember to surround executables with exec {}, but this is less noise IMHO than having to check $LastExitCode and throwing an exception.

For those of you using psake for your builds, the Exec helper function is included in the latest versions of the psake module. So you can use it in your build tasks to ensure that you don’t try to run unit tests if msbuild fails horribly. smile

Happy Scripting!